


OVERVIEW
1.1 - ABOUT RNASEQ
RNASeq is a Client-Desktop Application of the GPRO suite with custom dedication to manage and run pipelines and workflows for differential expression and enrichment analysis based on RNASeq data using a protocol based on the State-of-the -Art (Fig.1). The application is coupled with an infrastructure of server-side dependencies (pipelines, databases and tools) that we distribute in a container that can be installed on a remote server or on a PC with sufficient RAM. The app also includes a File Transfer Protocol system (FTP) to facilitate the upload and download of files from the user’s computer to or from the server; a progress tracker (job tracking system), and two different execution modes (a “step-by-step” mode, and a “pipeline-like” mode).
The Step-by-Step mode is a procedure similar to those implemented in Galaxy (Afgan et al 2018) and others GUI-based solutions for NGS data analysis. This mode organizes the different steps of the RNASeq workflow (i.e. quality analysis, preprocessing, mapping, transcriptome assembly and/or quantification, differential expression, and enrichment) into an intuitive menu providing a selection of command line interface (CLI) third party software for each step allowing different protocols to perform the analysis with or without a reference genome or transcriptome. At the same time each CLI tool has an interface implementation with distinct fields to declare the inputs and outputs files or for tuning the options and parameters provided by that tool.
In contrast, the pipeline mode is a pipeline configuration system allowing the user to execute all the steps of a given protocol automatically one after the other. To this end the user just need to select an specific pipeline from a list, declare the experiment design as well as the input and output data, then configure the option and parameters and finally run the pipeline where the distinct analyses will be executed sequentially one after another.
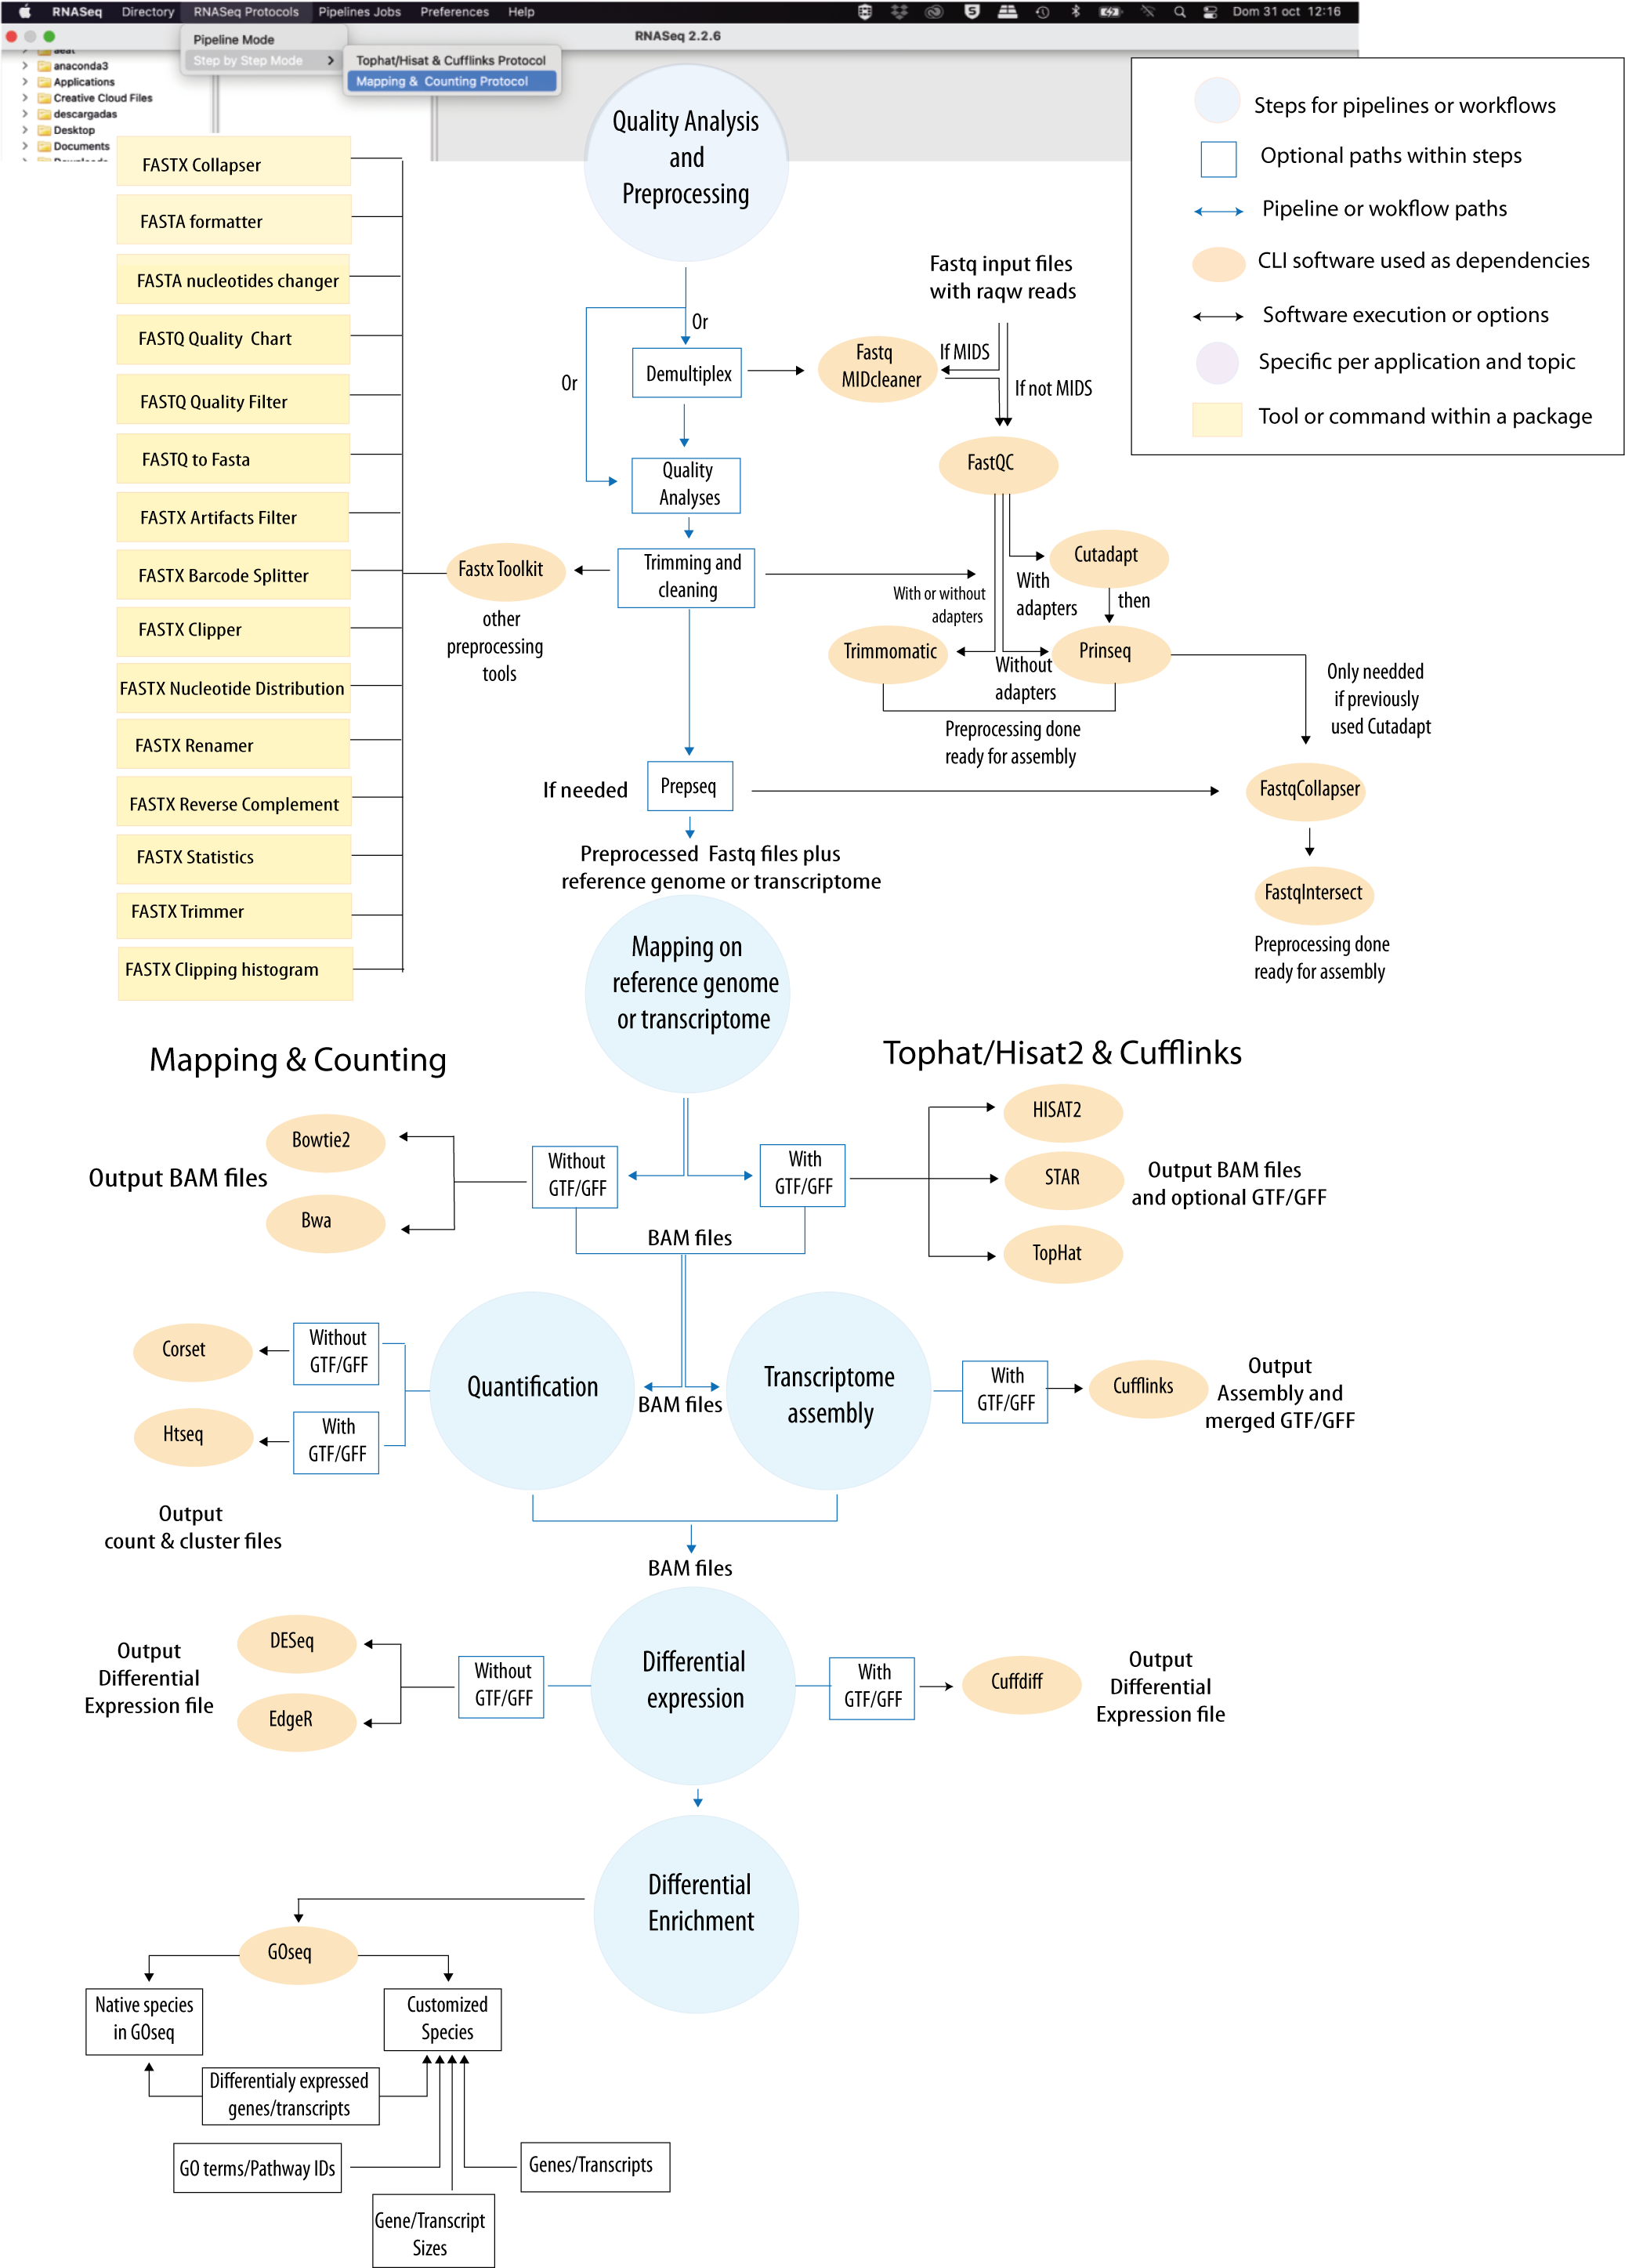
Figure 1: Bioinformatic protocol implemented in RNAseq for differential expression and enrichment analysis according to the most common RNA-seq practices. The tool provides two execution modes (Step-By-Step and Pipeline-like) and two alternative analytical paths (“Mapping & Counting” and “Tophat/Hisat2 & Cufflinks”). An interactive version of this protocol is available at GENIE our virtual assitant.
CITING RNASEQ:
Hafez AI, Soriano B, Elsayed AA, Futami R, Ceprian R, Ramos-Ruiz R, Martinez G, Roig FJ, Torres-Font MA, Naya-Catala F, Calduch-Giner JA, Trilla-Fuertes L, Gamez-Pozo A, Arnau V, Sempere-Luna JM, Perez-Sanchez J, Gabaldon T, Llorens C. 2023. Client Applications and Server-Side Docker for Management of RNASeq and/or VariantSeq Workflows and Pipelines of the GPRO Suite. Genes; 14(2):267. https://doi.org/10.3390/genes14020267CITING THE GPRO SUITE:
Futami R, Muñoz-Pomer A, Viu JM, Dominguez-Escribá L, Covelli L, Bernet GP, Sempere JM, Moya A, Llorens C. 2011. GPRO: the professional tool for management, functional analysis and annotation of omic sequences and databases. Biotechvana Bioinformatics: 2011-SOFT3, http://bioinformatics.biotechvana.com/index.php/article/351.2 - VERSIONS AND DOWNLOADS
RNASeq includes an installer for Windows 7 (64 bit), a self-extracting disk image for Mac OS X 10.6 or later (64 bit), and a compressed tarball archive for Linux 2.6 kernel series or later (64 bit). You can download the lastest version of these executables at this link:1.3 - INSTALLATION AND REQUIREMENTS
1.3.1 - INSTALLING RNASEQ IN YOUR PC
RNASeq is a Java application that can be easily installed on PCs with at least 2GB of RAM and that have installed the Java Runtime Environment (Java JDK) version 17 or above.To check if you already have a JDK installed, open a command line interface and type:
java -version |
$ java -version
|
For installing JRE, go to the official JRE repository here and download the version that suits your operating system. Once installed, check again the output of the java -version command show above on your command line interface. Sometimes, although the JRE is installed, it is not set at the root path.
To install the Windows version
Download the
RNASeq-win32.win32.x86_64.zip file and unzip it.
Then browse to the executable file “RNASeq.exe” and execute/run it.
To install the Mac version
Download the
RNASeq-macosx.cocoa.x86_64.zip file and unzip it. Then browse to the executable binary file "RNASeq.app" and execute/run it.
To install the Linux version
Download the
RNASeq-linux.gtk.x86_64.zip file and unzip it. Then browse to the executable binary file “RNASeq” and execute/run it.
1.3.2 - SERVER SIDE DEPENDENCIES
RNASeq is a Client Side + Server Side solution thus meaning that the application is coupled via API with a bioinformatic infrastructure called GPRO Server Side that contains all the dependencies needed by RNASeq to execute the workflows and pipelines. These dependencies are scripts, databases and the following third party CLI software:
- for quality Analysis and Preprocessing:
- Fastx Toolkit (Hannon Lab 2016)
- Cutadapt ( Martin 2011 )
- Prinseq ( Schmieder and Edwards 2011 )
- FastQC ( Andrews 2016 )
- and Trimmomatic ( Bolger et al. 2014 )
- for mapping:
- Tophat2 ( Trapnell et al. 2012;Kim et al. 2013 )
- Bowtie2 ( Langmead and Salzberg 2012 )
- Hisat2 ( Kim, Langmead, and Salzberg 2015 )
- BWA ( Li and Durbin 2009 )
- SamTools ( Li et al. 2009 )
- STAR(Dobin et al. 2013)
- for quantification and differential expression:
- Corset ( Davidson and Oshlack 2017)
- HTseq ( Anders et al 2015 )
- Cufflinks ( Trapnell et al. 2012)
- gffread ( https://github.com/gpertea/gffread)
- EdgeR ( Robinson, McCarthy, and Smyth 2010)
- DESeq ( Love, Huber, and Anders 2014 )
- Cummerbound ( Goff et al 2013).
- For enrichment: Goseq (Young et al. 2010)
The GPRO Server Side can be installed in the PC of the user or in remote servers as a Cloud Computing resource. However, its installation is a complex task due to the lot of dependencies and requirements (besides of the CLI software) for installing and running this infrastructure. For this reason, we distribute the GPRO Server Side in a Docker container that can be easily installed for the user in a couple of steps. Indications for installation of the GPRO Server Side Docker are available here.
1.3.3 - LINKING RNASEQ WITH THE SERVER SIDE
Once the GPRO server side docker has been installed you need to link RNASeq to it. To do this, go to [Preferences → Pipeline connection settings] in the top menu and type the following into the configuration Dialog (Fig.2):- Your email address: to receive notifications from the server.
- Host / IP address: here you should type localhost (see figure 2).
- Port number:This field should be filled only in case of you installed the server side manually and need to access via SSH. In that case the default number will be 22.
- Username and password: Your ID credentials provided to access the host server.
As also shown in Figure 2 you can also check the option “Run GPRO server locally using Docker” to let you to automatically start the GPRO container each time you run RNASeq (Also note that if you have this option checked you do not need to type the port). You can test if the app is connected to the Server Side clicking on the tab “Test connection settings”. Alternatively, if you install the Server Side manually (without the Docker) just add the IP of the remote server where the Server Side is hosted, add the port information (by default 22) and keep the Option “Run GPRO server locally using Docker” unchecked.
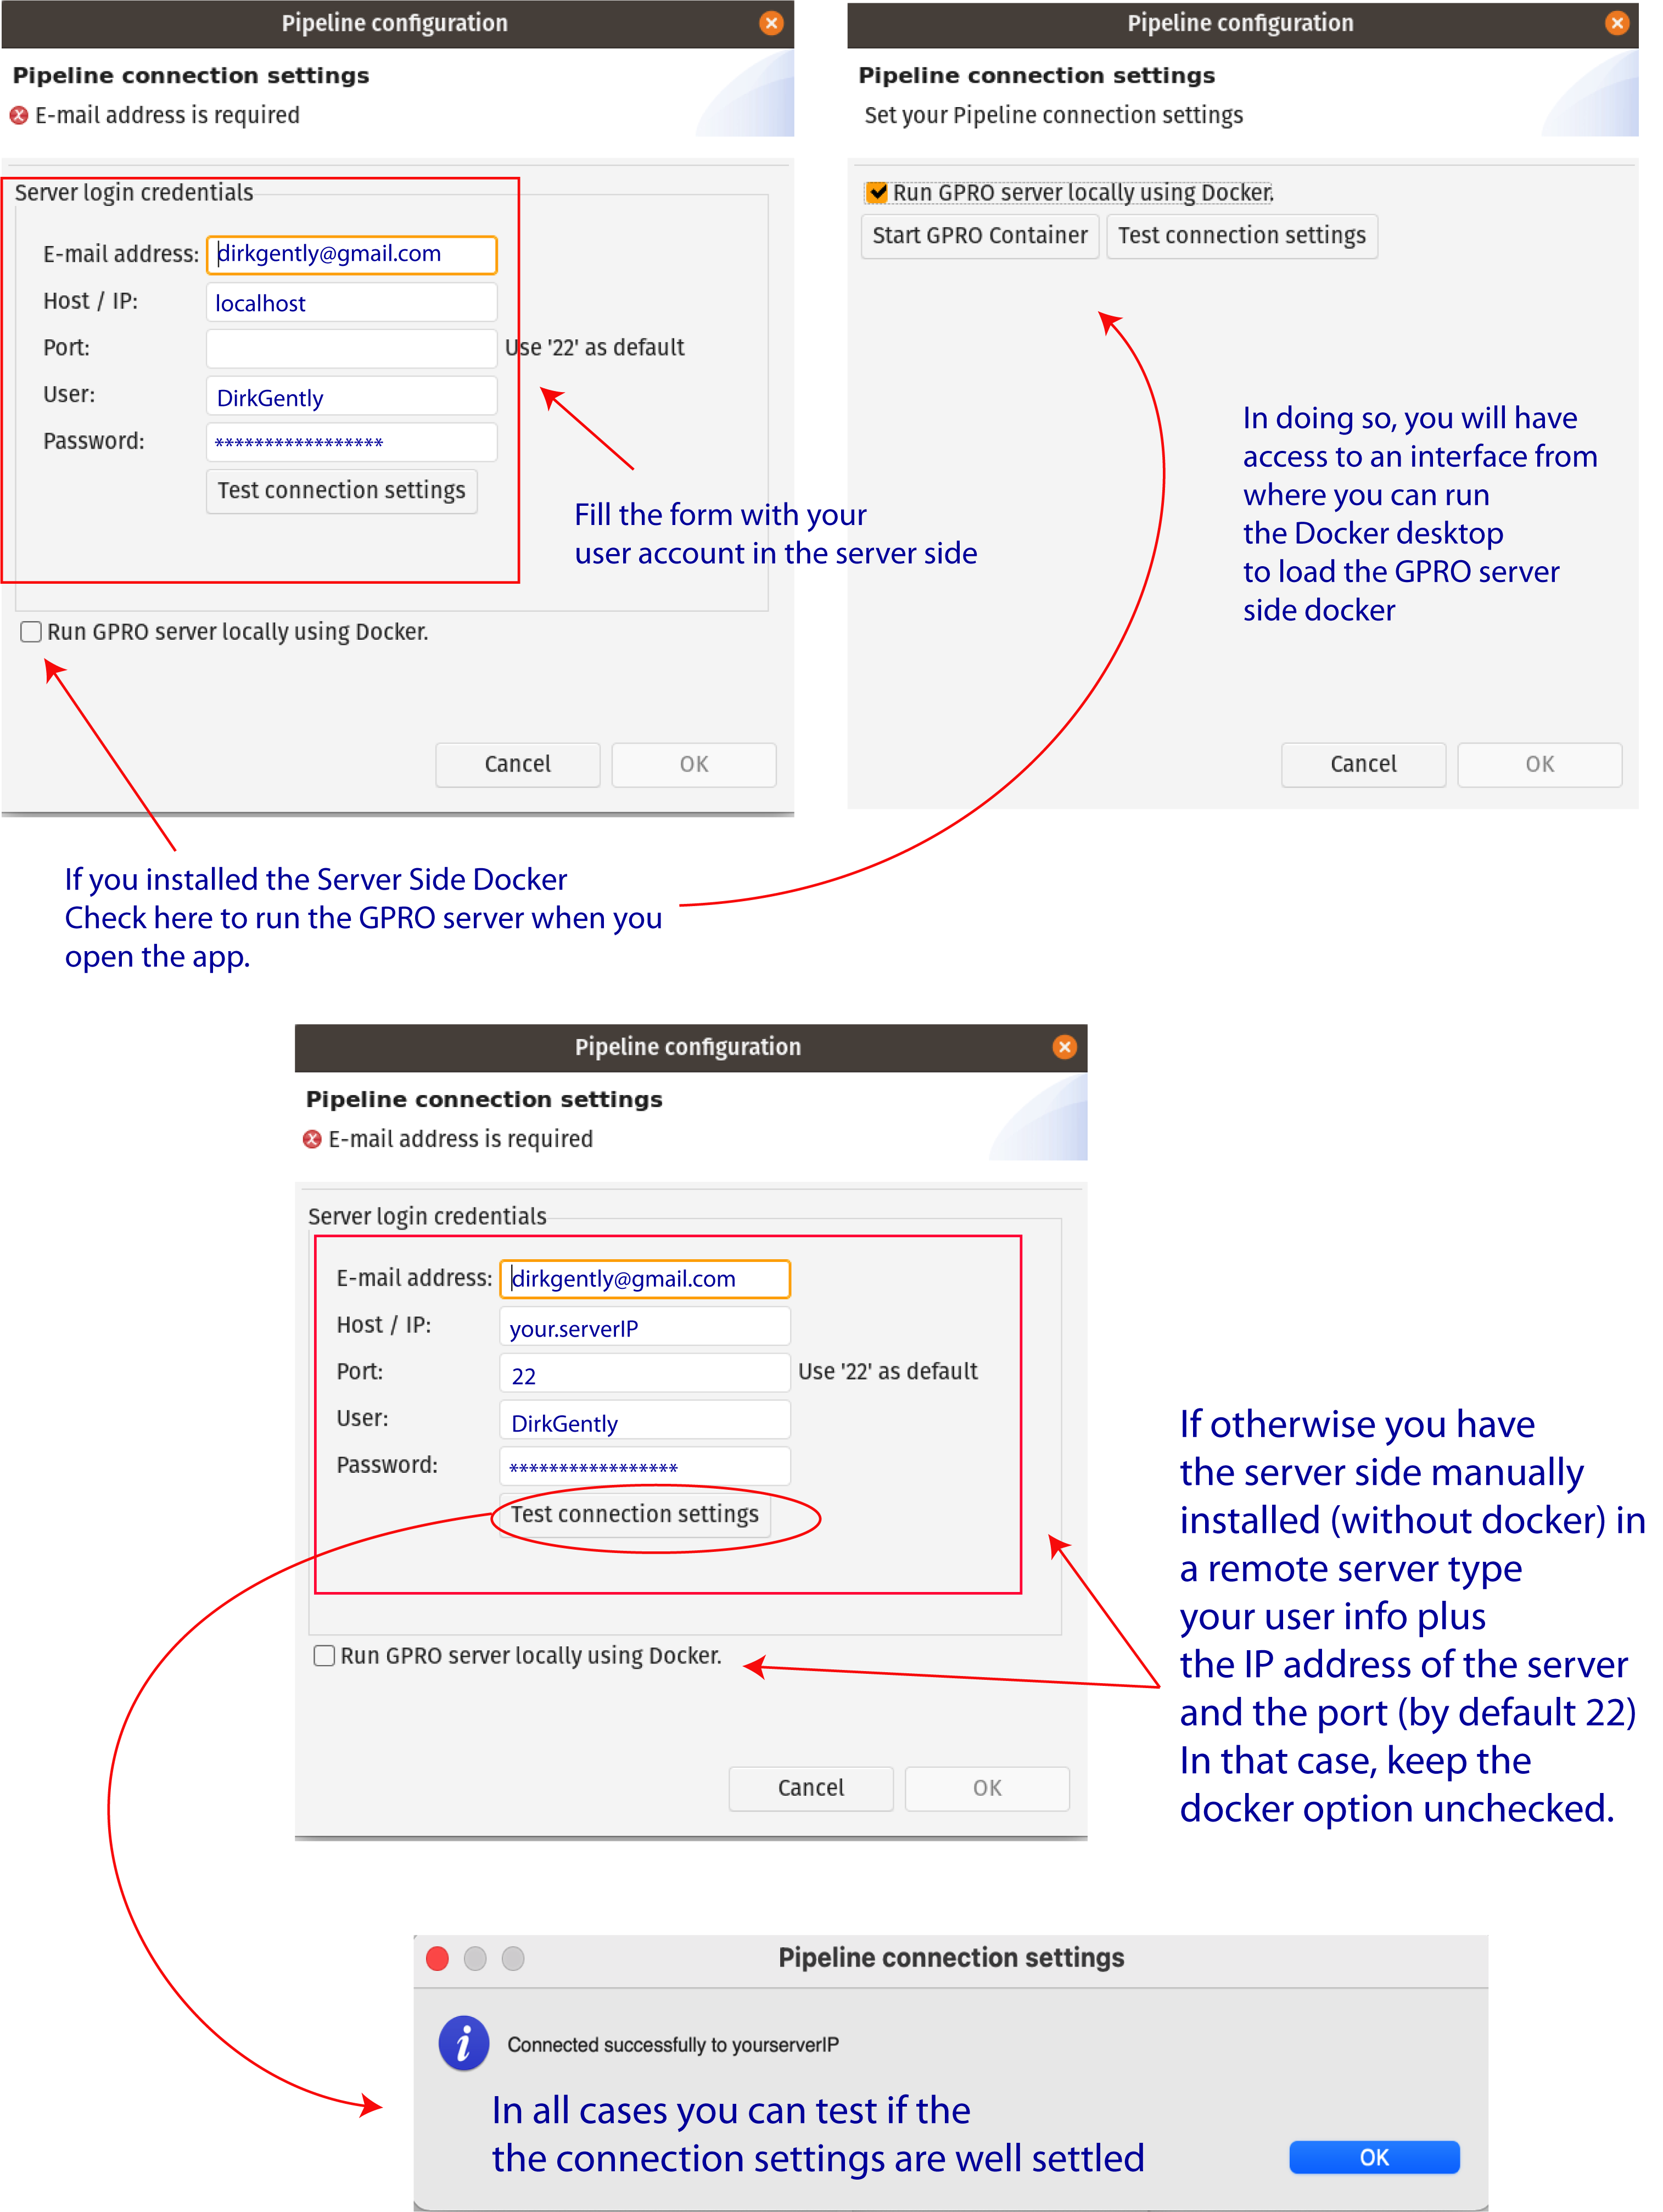
Figure 2: Server connection dialog.
1.3.4 - RAM ASSIGNATION TO YOUR PC
To modify the RAM assigned to RNASeq, you can edit two parameters (‘Xms’ and ‘Xmx’) in the “RNASeq.ini” configuration file. In Linux or Windows computers, the “RNASeq.ini” configuration file is located inside the RNASeq app folder. In macOS computers, the file can be found by right-clicking on[RNASeq.app → Show package contents → Contents → MacOS → RNASeq.ini.].
Within the “RNASeq.ini” file, the Xms and Xmx parameters look like this:
Xms1024m (Minimum allocated memory)
|
1.4 - GETTING FAMILIAR
1.4.1 - RNASEQ LAYOUT
The layout of RNASeq is structured in the following sections: the "Directory Browser", the "FTP Browser", the "Working Space", the "Top menu" and the "Step-by-step Interface Menu". (Fig. 3)- DIRECTORY BROWSER: This provides access to any folder already contained in the user’s PC so that it can be uploaded into the RNASeq application.
- FTP BROWSER: This provides access to the files contained in the server, allowing for files to be transferred from or from the server / directory browser. This is achieved by dragging the files from one side to the other.
- WORKSPACE: A central working space for viewing the different pipeline interfaces.
- TOP MENU: Main menu that allows for the selection of work mode, selection and execution of pipelines, and server connection preferences.
- STEP-BY-STEP INTERFACE MENU: The menu for managing the step-by-step protocols.For details of the Step-by-step menu see the Section “Step-by-step mode usage” of this manual.
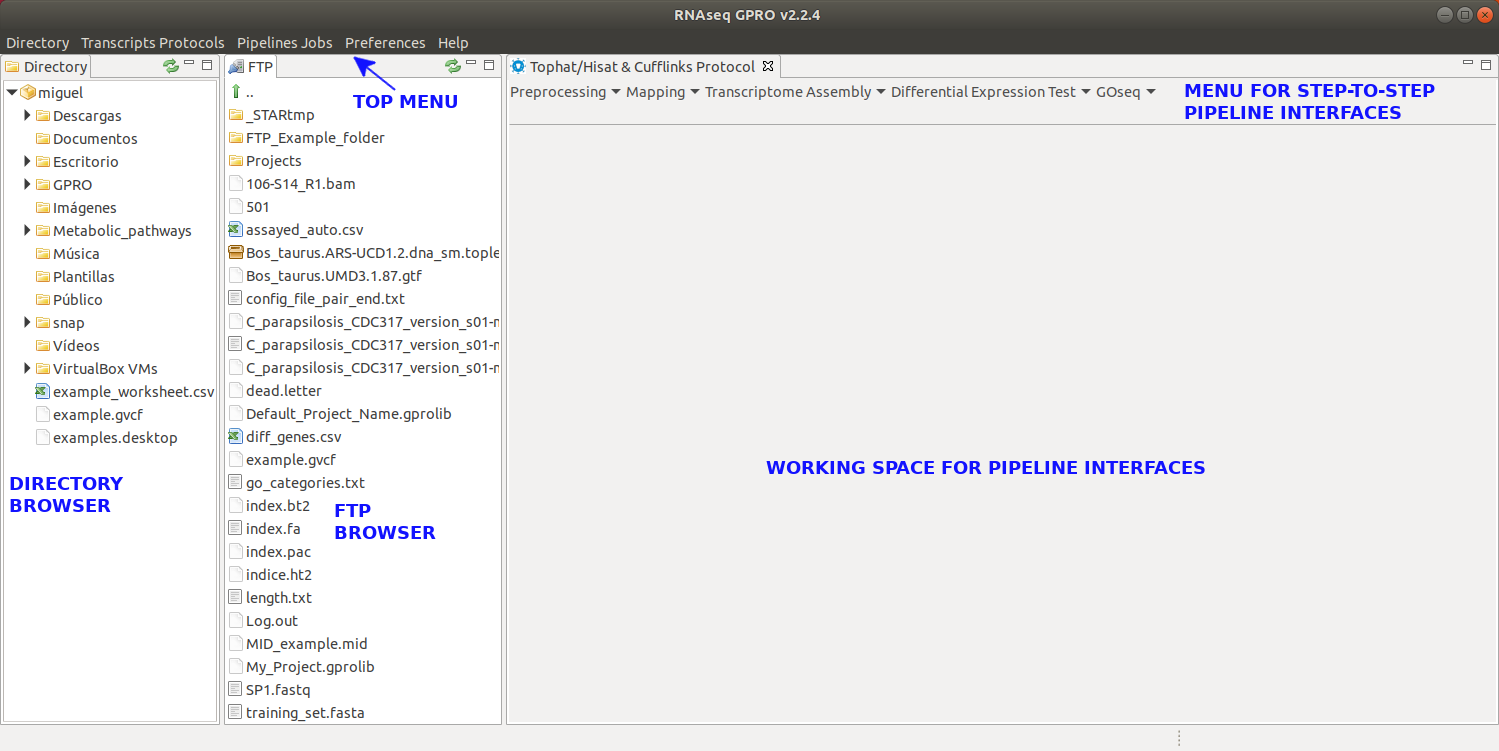
Figure 3: Main layout of RNASeq. Both the Directory and FTP Browser windows can be either resized or masked by clicking on the window icons at the top right corner of their respective windows. All files and folders contained in either of these browsers can be managed manually using the mouse. Please keep in mind that the window views shown in this manual will change depending on the operative system used.
1.4.2 - FUNCTIONS OF THE TOP MENU
The Top Menu presents the following tabs, each of which has a scroll down list with the following functions:- DIRECTORY:
[Directory → Select directory folder ] :Selects a workspace from the directory browser.[Directory → Show ] :Shows the Directory Browser.[Directory → Hide ] :Hides the Directory Browser.- TRANSCRIPTS PROTOCOL:
[RNAseq Protocols → Pipeline Mode] :Configuration view to set up your RNASeq experiment and launch a RNASeq pipeline.[RNAseq Protocols → Step-by-Step Mode → Tophat & Cufflinks Protocol] :View of the Tophat & Cufflinks Protocol in manual mode.[RNAseq Protocols → Step-by-Step Mode → Mapping & Counting Protocol] :View of the Mapping & Counting protocol in manual mode.- PIPELINE JOBS:
[Pipeline Jobs → Jobs Tracking System ] :For jobs tracking.[Pipeline Jobs → FTP Transfers ] :screen for tracking the jobs of the sFTP protocol.- PREFERENCES:
[Preferences → Pipeline Connections Settings] :Gives access to the server login details setup your user credentials for accessing the server.- HELP:
[Help → About RNASeq ] :Technical details and copyright of RNASeq, as well as links to the license and user manual.
1.4.3 - SOME BASICS ON THE RNASEQ INTERFACE
A typical interface of RNAseq to call a CLI software dependency of the server side, is based on two sections. The first section presents distinct fields to declare the input and output material of an analysis while the second is section presents distinct fields for configuring the options and parameters of the called CLI tool.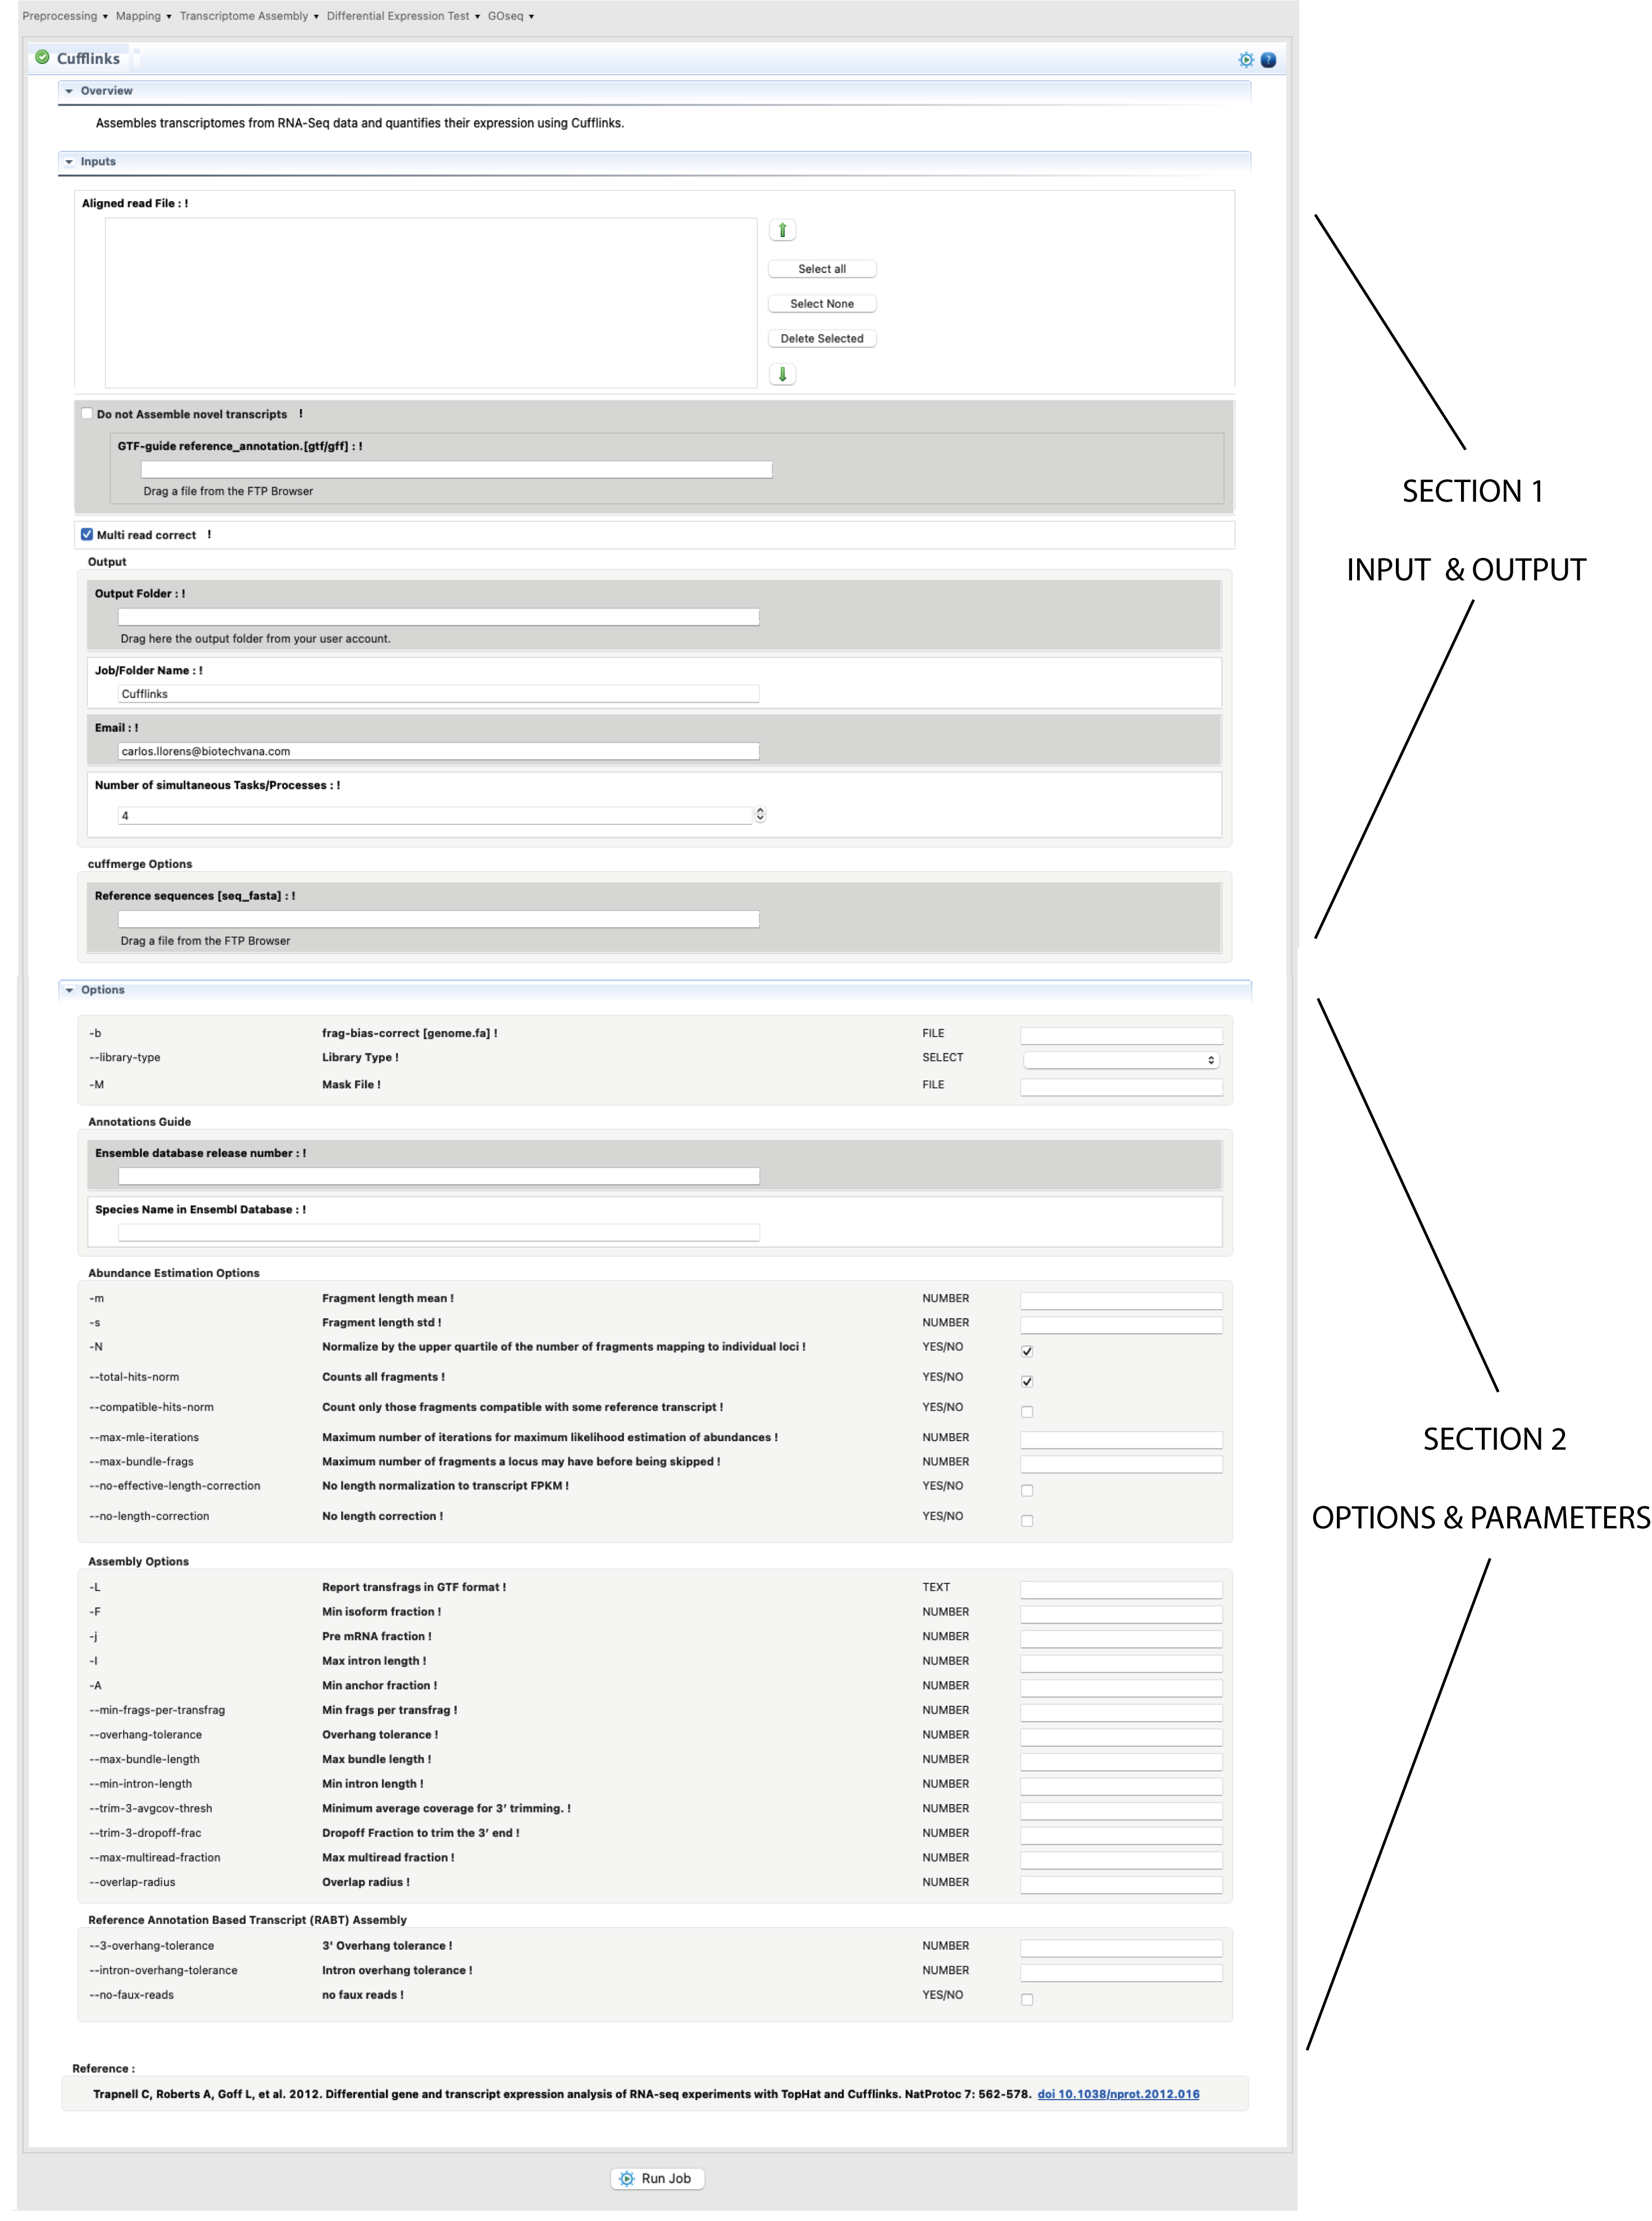
Figure 4: Example of interface for a CLI tool provided by the ”RNASeq” Step-By-Step mode. The figure shows the interface for Cufflinks.
The procedure is illustrated in Fig.4. Basically, you only need to select with the mouse the input file/s in FTP browser and drag it/them to their respective fields of the interface. The same can be done for the folder/s where you would like to have declared the output. Next, and if any, fill all other mandatory field(s) in the input/output section. If an input field is invalid or missing, you will get an error icon ![]() beside the field (to see the error message you will need to hover the mouse over that icon). Next, configure the form for options and parameters available in the second section. If you set a parameter out of the possible range, you will receive a warning icon
beside the field (to see the error message you will need to hover the mouse over that icon). Next, configure the form for options and parameters available in the second section. If you set a parameter out of the possible range, you will receive a warning icon ![]() . IIf you need more information about any input or parameter, click on the exclamation mark ! in front of the input field name.
. IIf you need more information about any input or parameter, click on the exclamation mark ! in front of the input field name.
Filling the section of options and parameters is not mandatory. If you run the program without inputting any parameters and/or condition, RNASeq will execute this program using the default conditions for this program.
Once the job input fields and the parameters have been fulfilled and/or configured, you only need to click to start button at the end the interface form to run the Job. If the job has been successfully launched, you will get a confirmation message. Otherwise revise again all input and outputs upload and the options if any.